Pages

Sunday, January 30, 2011

Valentine Garland

 Making a Valentine's Heart Garland

Supplies :  
Cardboard heart cutouts
Asst. Red, Pink, etc. scrapbook paper
Valentine stickers, misc. hearts, pom poms, ribbon, flowers,etc.
(anything you want to use that basically is pink or red)
Solid red ribbon
Hot glue gun
Hole punch
Tape

To Make The Hearts :
The first thing you do to each heart is to cover them with a piece of scrapbook paper. To do this trace each heart onto the backside of the scrapbook paper, cut it out and then glue to your cardboard heart. Next punch two holes in your heart, one on either side near the top, for the ribbon to go through later. 


Once all of your hearts are covered with the paper it is time for the real fun to begin! Plug in the hot glue and get creating! Gather up all of your misc. valentine / red and pink goodies that you have collected and start glueing. The first thing that I like to do with each heart is glue on the border. For the borders I used flowers, ribbons, plastic hearts, stickers, yarn, chenille stems, etc,  anything that I felt would make an impact. After the borders are all glued on it is time to decorate the insides of the hearts. There is no right or wrong way to do this - just have fun! Each heart will be different and unique! After you have completed the insides of your hearts, the final step is to thread your ribbon through the holes on either side of the hearts to create the garland. I spaced my hearts about 6-8 inches apart. After you have strung them all together - hang and enjoy!


Wishing you peace, love and a little pixie dust,
-Kendall-

Wednesday, January 26, 2011

Decorating with Blue and White

Some people choose to go with a blue and white theme through out their home, while others find blue and white pieces the perfect accents for their decor. The timeless effect created by blue and white china pieces helps to instill a feeling of warmth and traditionalism in your home. 
On top of this television armoire is a collection of blue and white china pieces. Here I mixed urns, vases, plates and jars. Some have been handed down from grandparents, others given to me by friends and family and still others I have simply collected myself. Each piece has it's own story. 
This picture is from a hallway table. Here there is only one blue and white urn that has been mixed in with other table top items on display. Sometimes a single piece has just as much impact and makes just as large of a statement as a grouping of similar pieces does. This urn was a special piece given to me by my grandmother. I chose to display it alone, rather than in a grouping of similar blue pieces, to heighten it's interest and importance. 
This picture shows a grouping on my mantle. Here I have chosen to mix different styles of blue and white pieces but all with an oriental design. 


When decorating your home with blue and white pieces there really is no rule to follow. Choose the pieces that have meaning to you or just catch your interest in some way. Mix like patterns and different patterns, like styles and different styles - the sky is the limit! The most important rule of thumb to remember is this - this is your home. There is no right or wrong way to display them. Do what feels best for you and you will achieve your desired effect. 
Wishing you peace, love, and happy decorating,
-Kendall - 

Tuesday, January 18, 2011

Cupcake of the Month - S'mores

Ingredients :
1-Pkg.(18.25oz.) yellow cake mix
3 eggs
1/3 cup oil
1/2 t. vanilla extract
1c. chopped chocolate covered graham crackers
1c. butter, room temp.
1/2c. unsweetened cocoa powder 
2 3/4 c. Marshmallow fluff
1 1/4c. powdered sugar
Marshmallow fluff, plain graham crackers & Halved snack size Hershey bars, optional
Directions : 
Preheat oven to 350*. On med-low speed beat cake mix, 1 1/3 cups water, eggs, oil and vanilla until combined. On med-high speed beat until fluffy, about 2 min. Stir in chopped graham crackers. Divide batter evenly among muffin cups filled with cupcake liners. Bake 15-18 min., or until toothpick inserted into center comes out clean. Cool 10 min. Transfer to racks and cool completely.
On high speed beat butter until fluffy. Beat in cocoa. Add 2 cups marshmallow fluff and beat on low speed until combined. Gradually beat in powdered sugar until smooth. Set aside.
Transfer remaining fluff to pastry bag fitted with a small round tip (or ziplock bag and cut a corner off). Cut 2" slit into top of each cupcake, pipe fluff into centers. Spread tops with reserved frosting. For garnish, spread fluff over plain graham crackers, top with chocolate bars and set on top of cupcake. Enjoy!

Tips of the day : These cupcakes are very yummy, but they are also quite messy to make! Be sure and reserve yourself about 1 1/2 hour of time when planning on making them. I definitely recommend trying these! 
Wishing you peace, love and chocolate dreams,
-Kendall- 

Monday, January 17, 2011

Snow Dough

Homemade Snow Dough

Kids shouldn't have to wait for an actual snow day to have some wintry fun and build their own snowmen! Just whip up some of this sparkling white "snow dough" and they'll be squishing and rolling their way into fun in no time! 

Ingredients:
1 cup flour
1 cup water
1/2 cup salt
1 T vegetable oil
1/2 t. cream of tarter
2 T white tempera paint
1 T white or iridescent glitter

To make a batch combine all of the ingredients in a medium size saucepan. Cook over medium heat, stirring constantly, until the mixture holds together (about 5 minutes). Remove pan from heat. Take the play dough out of the pan and set on waxed paper to cool about 15 minutes. Store cooled play dough in a ziplock bag in the refrigerator for up to 2 weeks. 


Wishing you peace, love and snow much fun,
-Kendall-

Tuesday, January 11, 2011

Snowman Lollipops


Snowman Lollipops

Supplies :
1- Large Marshmallows (3 per pop)
2- White Chocolate Candy Melts
3- Lollipop sticks (about 7" long)
4- Mini M&M's
5- Cellophane Bags
6- Ribbon
7- Waxed Paper


To make the lollipops, put 3 marshmallows on each stick. The stick should come about 3/4 of the way through the top marshmallow (the head) but not poke all the way through. Make sure the marshmallows are touching with the flat sides up. 


Melt the chocolate. Once chocolate is melted, dip the marshmallow pops into the chocolate. Be sure they are completely covered so the marshmallows won't get hard. Once covered, shake lightly to allow excess to drip off, then place on waxed paper. While the chocolate is still wet, add M&m's for eyes, nose and buttons. 


After the chocolate has set and marshmallows are completely dry, peel them from the waxed paper, put in a cellophane bag and tie with a ribbon. 


These lollipops are easy to make and fun for all. I found the idea on a website and decided to run with it! We made these on a snow day after we had been outside making a snowman - we ended up having a snowman day all around! 

Wishing you peace, snowy days and a little pixie dust, 
-Kendall- 


Sunday, January 9, 2011

Egyptian Birthday Party

For Hudson's 6th b-day he wanted to have an Egyptian party. This kind of threw me for a loop, but i soon had an idea forming and was off and running! Hudson wanted them to eat the cake and ice cream inside of a "pyramid", so it was time to get creative.
I made my pyramid out of canvas drop cloths (which I got at Lowe's), different shades of brown spray paint, black spray paint and I used an Egyptian Heiroglyphics book for a reference. First, I painted the drop cloths with the different shades of brown, then I used the black spray paint to draw sections on the canvas. To complete the pyramid "walls" I drew heiroglyphics inside each of the panels with my black spray paint - using my Egyptian book as a guide. After the "walls" were finished, I constructed our pyramid by hanging them around all 4 sides of our patio, leaving an opening on one end as the entrance. On either side of our opening I placed different sizes and types of palm trees.


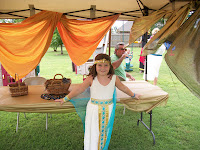
 When the party guests arrived they were each given a muslin top and sash to wear as their traditional Egyptian costume and a bag with 5 gold coins in it. Then they were directed to head over to our Egyptian marketplace, where they would make their collars, crowns, decorate a paper mache' sarcophagus and have their picture taken against a pyramid backdrop that I painted. To make the marketplace I used tents and different cuts of fabric to drape on them. As the kids went from each market booth to make their craft, etc. they had to pay each of the booth owners 1 gold coin to get to make what they were selling.


To enter the pyramid each of the kids had to pay King Tut with their last remaining gold coin.
At the children's place settings they each had a mummy we had made with treats inside and their place cards written in heiroglyphics. To make the mummy treats we made paper cones, filled them with treats and them wrapped them with strips of muslim. To decorate the table I used gold jeweled fabric, palm trees, gold coins and jewels, small egyptian figurines and gold plates, napkkins, etc. The cups we even glued jewels around.


The children all had a blast and the birthday boy was thrilled! All in all it turned out to be a wonderful Egyptian afternoon for all!

Wishing you peace, love and a little pixie dust,
-Kendall-

Related Posts Plugin for WordPress, Blogger...