Pages

Monday, March 14, 2011

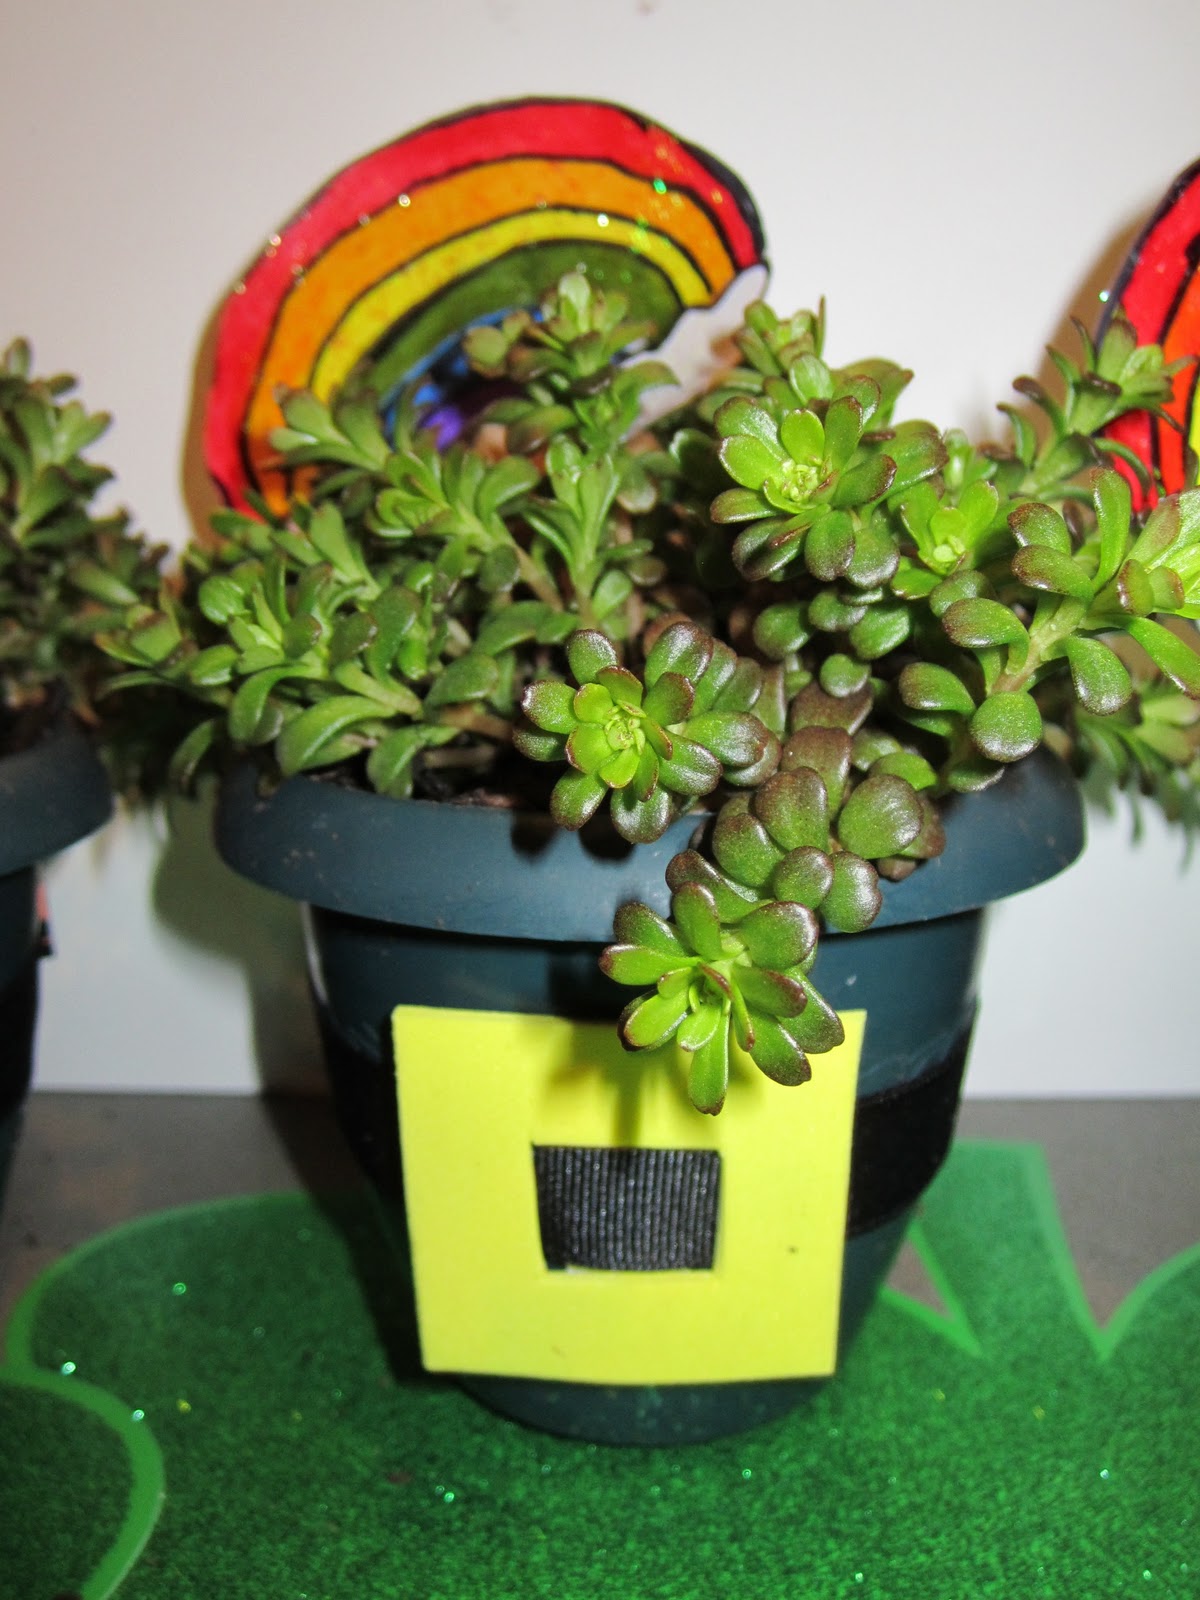
St. Patrick's Day Craft : Pot O' Green Leprechaun Planter


This St. Patrick's Day combine spring's green glory with the luck o' the Irish in this leprechaun hat inspired planter. Kids of any age can help with this project, so it's perfect for a St. Patrick's Day party or play date. You can even make a few of them as gifts for grandparents, teachers, neighbors, etc. 

Dress up an inexpensive plastic planter with a belt and buckle, rainbow pick and a plant. When helping your child select a plant, here are some hints to help make their choice easier. Green plants like succulents are easy to take care of, yellow plants like marigolds or primrose will make your planter into a "pot of gold", or there is always the traditional white clover, also known as Irish shamrock. 

Materials : 
> 3" green plastic planters (I got mine at Dollar Tree in a set of 4 ). 
> 1 small potted plant
> black grosgrain ribbon
> craft stick / popsicle stick
> 1 piece yellow craft foam
> white card stock
> markers, scissors, iridescent glitter glue, white school glue

Instructions : 
On your white card stock draw a rainbow with clouds on either side. Color it with the markers then cut it out. With a paint brush, coat your rainbow with the glitter glue. Set aside to dry. Make the belt buckle by cutting a 1" square out of your craft foam. Cut a square out of the center. Glue your black ribbon around the pot like a belt, and then glue the buckle on top of it in the front of your pot. Plant your plant in the pot. Glue a craft stick to the back of the rainbow. When dry, stick your rainbow pick in your plant. 


Wishing you peace, love and a little pixie dust,
-Kendall-

Sunday, March 13, 2011

St. Paddy's Pudding Dessert


This is a super cute and fun dessert to make for any St. Patrick's day celebration. It is sooo easy to make and  delicious too! I found this recipe on a cooking website and decided with just a few small changes it would be perfect for our family's St. Patrick's Day party. 

Ingredients : 

* 2 boxes (4 serving size each) vanilla instant pudding
3 1/2 cups cold milk
1 teaspoon green food coloring
1 tub Cool Whip (8 oz.)
1-18oz pkg. Oreos, coarsely crushed
Shamrock candies, cookies, etc. for garnish

Directions :  

Pour milk into large bowl. Stir in food coloring. Add pudding mixes and beat with a wire whisk 2 minutes or till well blended. Let stand 5 minutes. Gently stir in Cool Whip. In a trifle bowl layer crushed cookies and pudding mixture. Garnish as desired. Refrigerate for atleast an hour or till ready to serve.

** Tip - To make your pudding layers even, spoon mixture into the center. With your spatula, starting from the center and working out, spread your pudding mixture out. If layer is not as thick as desired, spoon more into the center and spread out again. **


Enjoy!
Wishing you peace, love and a little pixie dust,
-Kendall-

Wednesday, March 9, 2011

St. Patrick's Day Centerpiece


St. Patrick's Day brings to mind pots of gold, leprechauns, rainbows and shades of green. To help celebrate this holiday and bring the luck of the Irish to your home, create a centerpiece/arrangement like this one and the leprechauns will surely stop by!

Supplies : 

*1 Tall Glass Jar
*1 Clear Glass Vase (that will fit inside your jar leaving room all the way around it)
*Jellybeans in asst. shades of green
*14 White single stem roses
*Kelly Green & Lime Green Glitter
*Wire Edged Ribbon in Green
*Elmer's School Glue
*Lime Green "Mesh" ribbon
*Small plastic black "pot"
*Pieces of Gold


Step 1 : 
 Fit the glass vase inside of your glass jar. Fill the space between the vase and the jar with the jellybeans. Jellybeans can be quite expensive, so by inserting the vase in the jar first it helps limit the amount of jellybeans you have to purchase. 


Step 2 :
After you have filled your jar with jellybeans, it is time to glitter tip your roses. Get out three bowls and pour the glue, lime glitter and kelly green glitter each into a bowl. One at a time, dip the tips of the roses into the glue and then into a glitter. Continue until you have glitter tipped all of your roses and then place them inside the vase in your jar. 


Step 3 : 
The final step to complete your centerpiece is to accessorize it! Tie your green wire edged ribbon around the jar and then into a double loop bow. Set your pot of gold above your bow, resting on the jelly beans and right under your roses. Finally, cut strips of the lime mesh ribbon and randomly insert them into your flower bunch. 


Wishing you peace, love and a little pixie dust,
-Kendall-

Tuesday, March 8, 2011

Cooking with Kids : Rainbow Pudding Cones


Kids can't wait to get a lick at these sweet snacks that look just like yummy ice cream cones! But since they're filled with a thick creamy mixture of pudding and whipped topping mix, they're less messy and way healthier for them than ice cream! These pudding cones are perfect for an after school snack, a party or even dessert! They are colorful, fun and easy enough for kids of all ages to make!

Rainbow Pudding Cones

1 1/2 cups cold milk
1 pkg. (3.4oz) instant vanilla pudding mix
3 envelopes whipped topping mix (Dream Whip)
8 cake ice cream cones
Sprinkles, mini color-coated baking chips or topping of your choice

*** In a mixing bowl, beat milk and pudding mix on low speed for 2 min. Blend in whipped topping mix, cover and refrigerate for atleast 1 hour. Spoon into cones and then with ice cream scoop add top scoop on cones. Sprinkle with toppings. Serve immediately.***


Other tips and ideas to try : 
1) Chocolate or pistachio pudding
2) Food coloring to turn the vanilla pudding into "strawberry, orange, etc." - really any color of "ice cream" you want.
3) Try coconut, chopped nuts, jimmies, mini choc. chips, nerds, etc. for the toppings. 


***Tip - These pudding cones need to be enjoyed soon after making them!! We tried to refrigerate the left overs and ended up with leaning towers of Pisa!!!

Enjoy!


Wishing you peace, love and a little pixie dust,
-Kendall-

Friday, March 4, 2011

Celebrating With Dr. Seuss


Dr. Seuss's birthday is on March 2. Make a day of it with your children and celebrate! Reading the books to your kids is always great, but some of them also come in cartoons that are cute and fun to watch too! Here are a few ideas to make your day as whimsical, wacky and fun as the characters in his books are!!! 
Green Eggs and Ham
1- Craft : Make your own green eggs and ham placemats to eat on
2- Snack : Make the traditional sausage/egg casserole only substitute diced ham for the sausage and add green food coloring before you cook it

Casserole
Placemats


3-  Craft 2 : Make your own green eggs and ham craft by using green felt for the ham & to make the eggs mix 1 part shaving cream to 1 part glue, stir, add neon green food coloring then stir again. Glue the felt onto a paper plate, put a blob of the "eggs" on the plate and a green pom pom ball in the center of the "eggs". Let "eggs" harden.

Craft

One Fish, Two Fish, Red Fish, Blue Fish
1- Snack : Make blue jello in a clear punch cup and put gummy fish in it
2- Art project : Make fish out of their handprints, imitating the book cover
3- Art project 2 : Cut a fish bowl pattern out of the center of a paper. Glue it on top of another paper. The have the children draw a red fish and a blue fish inside the bowl. Have the children paint over their fish bowls with the clear/blue tinted elmer's glue to give the water effect. Sprinkle alittle glitter over the glue before it dries. 

Art Project 1 
Art Project 2


4- Game : Let the kids go fishing! Use a science project board and paint the cover of the book on it. Tie twine onto a bamboo stick and on the other end of the twine tie a magnet. Have the children "cast" their fishing lines over the board and catch fish or a treat (gummy fish tied up in a clear bag).
Fishing Game


The Foot Book
1- Art Project : Cut out shapes of feet/socks and get out the glue, glitter, markers, etc. and let them decorate them
2- Art project : Have the kids get in a circle, strip off their shoes, socks, etc. Get out the washable markers and decorate their toes/feet with all different types of faces!
3- Game : Trace their feet, cut them out and then play a musical chairs type game with them. (Put feet shapes in a circle, play music, children walk around, pull one foot shape out, stop music & whoever doesn't stop  on a foot steps out of the game. Continue this way till 1 child is left.)


The Lorax
1. Craft Project : Make Truffela Trees with your children. Use green play dough to make a grass hill on a piece of turquoise paper, stick yellow and black striped pipe cleaners (or solid yellow or black) into the play dough as the tree trunks and then glue pom pom balls onto the top of the pipe cleaners! Super cute!


The Cat In The Hat
1- Game :  Have your children try to balance things on their heads like the cat in the hat and walk around! First place a book on their heads, have then walk in a circle, then add a tea cup, walk, etc. Keep adding things until they can't balance anything else and it all comes tumbling down! 
2-  Craft : Make your own cat in the hat with a paper plate and a hat cut out. Attach the hat to the plate and then have the children color the hat and add the face. 
3 - Art project : Help the children draw a "portrait "of the cat in the hat.
4- Craft : Make "Cat in the Hat" hats out of white posterboard and red construction paper. After the kids have made their hats with face paint add a black nose and whiskers!

Craft Project
Art Project


Thing 1 and Thing 2 
( characters in the Cat in the Hat book)

1-Snack : Thing 1 & Thing 2 cupcakes. Make red velvet cupcakes in red cupcake liners. Once they have cooled you can either tint icing turquoise or you can top them with a thin layer of icing as a "glue" and then stick blue cotton candy on top of them like wild hair. To finish the cupcakes use white dot stickers and write Thing 1 / Thing 2 on them and then affix them to the cupcakes. 
2 - Art project :  Paint the palm of 1 of the child's hands white and the 4 fingers blue. Make a print. The other hand paint solid red, turn upside down and make another print underneath the first one. Add a white circle to the center of the red handprint and write Thing 1 & Thing 2 in them.


Bartholomew and the Oobleck
After reading the story make oobleck!
Recipe : a large mixing bowl, mixing spoon, green food coloring, 10 cups cornstarch, 6 cups room temp. water.  Put water in bowl, add food coloring, mix in cornstarch - 1 cup at a time - till thoroughly mixed. Put globs in paper cups and let children play with it!

Hudson
Julian


Piper
Happy Birthday Dr. Seuss!!!
Wishing you peace, love and a little pixie dust,
-Kendall-
Related Posts Plugin for WordPress, Blogger...